Showing posts with label projects. Show all posts

Wednesday, January 16, 2013

Rick Rack Flowers - the Possibilities are Endless!

As promised, I'll spend today's post talking about Rick Rack flowers and walking you through the simple steps to flower perfection. When I first learned about this possibility I was a bit nervous. To me, Rick Rack screams obnoxious clown costume or holiday sweater, NOT wedding elegance.

Case in point -
Not Pretty.

 I was pleasantly surprised with the gorgeous outcome.

Pretty.  (See the difference?)

The steps to making one of these beauties are going to look a little bit complicated.  Once you make your first, though, you'll easily be able to whip up a dozen during an episode of The Bachelor or Modern Family, whatever you prefer.  I tried to take a picture of each step because it's so much easier to be able to visualize everything.  You will notice that I used colored thread - this is for demonstration purposes only.  I suggest matching your thread to the color of your Rick Rack, although if you do a good job you won't really be able to tell anyway.  PLEASE leave a comment if you feel that I'm missing a step or if you have any questions, I will be more than happy to expand more if needed.  Here goes!

step one:  cut each piece of Rick Rack so that you can count sixteen waves on the "top" and fifteen waves + the two ends on the "bottom."  I did try different size variations, and this seemed to be the smallest amount of Rick Rack needed to make a flower that is still full looking (using less material = less $ = happy me!).
sixteen waves on top and fifteen on the bottom
step two: sew through each wave on the "top" of the Rick Rack, folding them like a fan as you go.  You will go through all 16 waves.  Make sure your thread has a knot at the end!

fold the Rick Rack like a fan as you go

When finished, your Rick Rack should look like this:

front view

side view

step three:  slide the Rick Rack down to the knot in your thread.  Tie both ends of thread together to form a loop - make sure it's tight!  Don't cut the thread yet.

if done correctly your Rick Rack should look like a goofy caterpillar

tie both ends of thread together in a loop


at this point your Rick Rack is starting to look like a flower, but the top and bottom are indistinguishable (is that a word?)
step four:  to add shape to your flower, lay it on the table with the "bottom" facing up (remember, that's the side with the two cut ends).  Without cutting the thread, start sewing through the inside corners of the waves.  When you make it all the way around the circle you can tie the ends together again.  Now cut the thread.

sew through the inside corners of the waves
pull tight to bring the sides together

step five:  turn the flower over so the correct side is facing up.  It should look more like a flower now, with two threads going through the center.  Spread the petals evenly and put the tip of your finger in each to help fluff them up.

two threads run through each flower, giving it shape
step six: now it's time to add the stamen to the flower.  I found that these really were an important step that added the perfect finishing touch.  You can find flower stamen in any craft store.  I usually find them in the cake decorating section.

adding the flower's stamen will be the perfect final touch!
Fold the stamen in half and insert it through the center of the flower, starting at the top.  I had a bit of trouble getting the fragile stamen wire through some of the flowers, and I found that a plastic fork with all but one of the tines removed was the perfect tool!  Leave a loop at the bottom of the stamen so that you can later attach a wire, if desired. 

insert the stamen from the top down, leaving a loop at the bottom
step seven:  use tacky glue on the bottom of the flower to keep the cut ends of the Rick Rack from fraying, and the stamen in place.  Any tacky or fabric glue should work.

the tacky glue I used to finish off the flower
step eight:  let your imagination run wild!  I used these flowers in my brooch bouquet as fillers and was very happy with the result.  They would also make adorable headbands, hair clips, brooches, etc.  To add them to my bouquet I wrapped floral wire through the stamen loop.  To keep them from drooping over I used floral tape.

Rick Rack flower with wire covered in floral tape
Now you're finished!  

I used yellow Rick Rack flowers in the bouquets that I made for my bridesmaids, as well as the groomsmen boutonnieres and mother wrist corsages.  Don't they look a bit like popcorn all piled together like this?
I hope you enjoyed!  Again, let me know if you have any questions!  Please Follow, Pin, Share, Like, etc!  If you would like to order any handmade flowers from me just send me an email or comment below.

do it yourself - and I'll help!
diyandiblog.gmail.com

Tuesday, January 15, 2013

Tangent Tuesday - home again, home again, jiggity jig

Tangent Tuesday :)

On this beautiful (and freeeezing) Tuesday I'm going to go on a little tangent from my posts about my wonderful DIY wedding and talk about what's going on NOW!  Back in June my incredible husband and I purchased our very first house (yay!) and we're in the middle of a daunting, exciting, pricey, time-consuming, and mostly fantastic new project of renovating and decorating our new home!

sold!  one of my favorite days :)
As you can imagine there have been LOTS of projects and changes going on since then, and I can't wait to start sharing them!  My plan is to finish up the wedding posts first, but I couldn't help but share a little tease about the big changes going on around here!  Removing 45-year-old carpet, painting, re-doing hardwood floors, tearing down plaster, hanging drywall, sanding, hanging trim, and so many other small projects along the way!  I am so excited about how everything is coming along and I've learned that there is nothing more exciting than walking in the door and feeling completely comfortable and peaceful in your surroundings.  

Since this is my first time owning a home I have never before had the experience of picking out paint colors with no parents watching/guiding my decision - talk about a new sense of freedom!

can you guess what this will become?

yes, the previous owners did decide that this was the best look for the first floor bathroom
no matter what I'm working on, Jobin is right there helping :)
Have you renovated a home?  Please share!  There really is nothing like the feeling you get from transforming an old house into a new home and filling it with memories of your own :)

Tomorrow I'll post about making rick rack flowers in a step-by-step guide, and then it will be time to put everything together for the brooch bouquet! 

Wednesday, January 9, 2013

POOF! Fabric flowers in every size!


Tall centerpiece at the reception


Enjoying the flowers post-wedding at home.
The decision to make fabric flowers for my wedding started as a control issue.  When my older sister got married a few years ago (another DIY affair), I had a mental breakdown trying to organize the to-do lists for the day of the wedding.  "Make wedding bouquets" "Make centerpieces" and "Make flower girl hairpiece" were all on my list that day - and if it wasn't for the help of a family friend, I'm not sure that any would have gotten done.  Horror stories of bug-infested flowers, refrigerators transforming expensive arrangements into icicles, and my own personal traumatic experience were just too much for me to handle.  I wanted my flowers to be ready months ahead of time, with no chance of disaster - and it WORKED!  I knew that I wanted some tall arrangements, and some short arrangements to alternate around the ballroom.  I was so happy with how they turned out!  I also ended up using smaller versions of these poofy flowers in the wrist corsages that I made for the moms and grandmas.


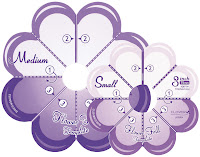
Making the flowers is very simple.  Initially I bought a pattern at Joanne Fabrics that looked like this :


It was helpful to start since it shows you where to fold and cut, but if you aren't interested in buying the pattern you can do just fine without.  Just follow the instructions below:

step one:  Start with a square of fabric (this will be one petal) - you will need 12-16 squares per flower, depending on the fabric you are using and how fluffy you want the flowers to be (make sure all squares are the same size). 

Fold square in half.

step two:  Fold in half again so you are holding a 1/4 size version of the initial square.


step three:  Fold in half again, this time from corner to corner.

Fold each layer separately


Cut the loose ends in a semi-circle.


step four:  While holding the folds in place, sew through all four layers at the folded end.  


String onto knotted thread (I recommend a strong thread that won't break easily).
step five:  Tie the two ends of thread together, pulling tight.
step six:  Pull apart the folds of each petal - POOF - your flower is done!

I used branches that I had cut to various lengths, and hot-glued the center of each flower to a branch.

Supplies Needed:
fabric - I love the look I achieved by selecting various fabrics that all "go" together
pattern (if desired)
strong thread
scissors
needle
glue gun (if you are attaching flowers to branches)
branches (if desired)

Please let me know if you have any questions or ideas that I haven't included!  My next post will elaborate more on turning these flours into unique corsages that will last a lifetime!  If you would like to order hand-made flowers please message me