Monday, February 16, 2015

Garden planning!

Is anyone else out there thinking of their gardens and the upcoming spring?  As a Wisconsinitte I know there are still months of winter left, but this year I feel like it's flying by!  My baby will be one in April so I know it will be here before I know it (and before I'm ready for it, most likely!).

This is the year my husband and I are going to invest a bit in our "curb appeal," lawn, and gardens.  I'm already excited thinking about the changes we'll make, and a bit overwhelmed at all of the possibilities!  I grew up on a farm, yet I am very new at gardening/landscaping.  Shade?  Sun?  Soil?  Zones?  It's all pretty much beyond my knowledge at this point.  BUT!  There are so many great resources out there and so far I'm enjoying my Pinterest and Google searches.

Last night I came upon a great tool on the Better Homes and Gardens website!  It's a garden planning tool that first asks you a series of questions, and then based on your replies it gives you a garden plot idea!  You can find it here:  http://www.bhg.com/gardening/plans/.  I went through the questions a few times, adjusting my answers based on my front yard, back yard, and vegetable garden.  I know I won't use their suggestions exactly, but I'm thrilled to at least have a starting point!

 
This is my husband, daughter and I in front of our house last spring.  Not a great house shot, but at least you can see that we're working with the bare minimum so far - boring evergreen bushes and some railroad ties are about it for front yard landscaping.  When we're ready to start tearing stuff out I'll be sure to take some good "BEFORE" shots! 
 
I guess before I get too far planning my garden I'd better figure out how to get rid of those bushes!!

Wednesday, March 13, 2013

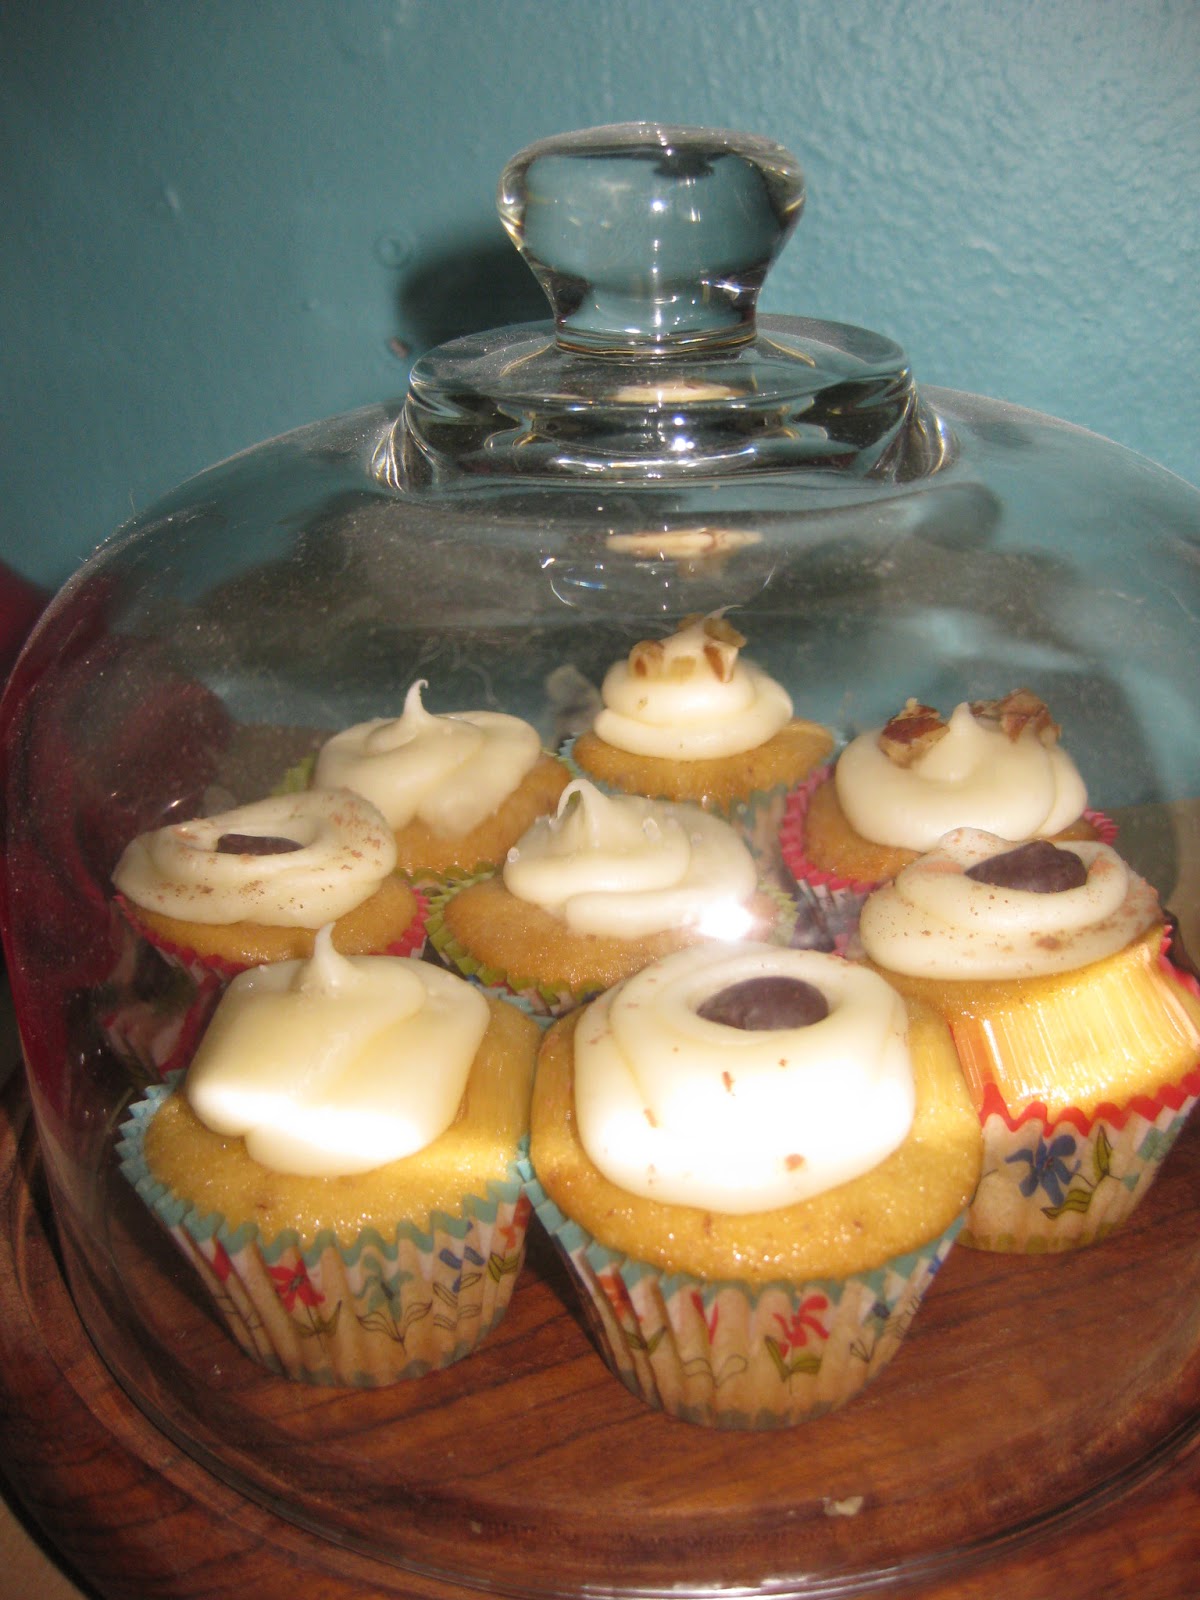
Maple Cupcakes

I gave up Chocolate for Lent, which left me in a bit of a bind when I was deciding what to make for dessert for a little family get-together at our house last night.  Chocolate, of course, is my go-to flavor so I was at a bit of a loss!
maple cupcakes - yum!
 I scoured my cookbooks looking for something new to try and stumbled upon this recipe for delicious Maple Cupcakes!!  It can be found in "Baked Explorations" by Matt Lewis and Renato Poliafito.  So far I have not been disappointed by any of their recipes that I've tried, and they add funny and informative little snippets throughout the book.  Plus, lots of pictures, which are always helpful!
You can find a great summary of their book by following this link:  http://the-dogs-breakfast.com/2010/10/31/baked-explorations/

Anyway.  These cupcakes were simple to make and got rave reviews!  They are not sickeningly sweet, which makes them perfect for a treat with coffee.  They also remind me of eating pancakes covered in syrup, so they therefor also make the perfect breakfast!  I'm telling you - you can't go wrong!  The only substitution I made in the recipe was using pecans instead of walnuts - otherwise I followed the recipe to a "T".  Good luck!
maple cupcakes:
  • 3 cups all-purpose flour
  • 3 teaspoons baking powder
  • 1 teaspoon salt
  • 1/2 cup butter, slightly softened, cut into chunks
  • 2 tablespoons vegetable shortening, at room temperature
  • 2 cups pure maple syrup
  • 3 egg yolks
  • 1 large egg
  • 1 1/4 cups whole milk
  • 1 cup walnuts, toasted and coarsely chopped
  1. preheat the oven to 325 degrees F.  line two 12-cup cupcake pans with paper liners
  2. in a medium bowl, sift together the flour, baking powder, and salt
  3. in the bowl of a standing mixer fitted with the paddle attachment, beat the butter and shortening until ribbonlike.  turn the mixer to low and stream in the maple syrup.  increase the spead to medium-high and beat until the mixture is nearly uniform in color, about 3 minutes
  4. add the egg yolks and egg, one at a time, and beat until just incorporated.  scrape down the sides and bottom of the bowl.  add half of the flour mixture and mix on low speed until incorporated.  stream in the milk.  stop the mixer, add the rest of the flour, then turn the mixer on until just combined.  scrape down the sides and bottom of the bowl and fold in the walnuts
  5. fill the prepared cupcake pan about three-quarters full.  bake the cupcakes for 20 to 25 minutes, rotating the pans halfway through the baking time, until a toothpick inserted in the center of a cupcake comes out clean  
cream cheese frosting:
  • 3/4 cup unsalted butter, softened
  • 12 ounces cream cheese, softened
  • 4 cups confectioners' sugar, sifted
  • 2 tablespoons maple syrup
  1. in the bowl of a standing mixer fitted with the paddle attachment, beat the softened butter until it is completely smooth.  add the cream cheese and beat until combined
  2. add the sugar and maple syrup and beat until smooth.  do not overbeat
I decided to make mini-cupcakes, which took about 13 minutes rather than the 20-25 minutes that the recipe suggests for standard cupcakes.  I frosted them by putting the frosting into a pastry bag fitted with the largest tip I have, and they ended up being adorable!  I topped them three different ways, and got my inspiration from standard breakfast pancakes - one variety had toasted pecans, another had cocoa powder and a chocolate chip, and the other had sea salt.  Next time they most certainly will be topped with bacon!
 toasted pecans, chocolate, and sea salt

These would make a great addition to any dessert table!  Please contact me if you are interested in ordering these or any other flavor of cupcake!  Delivery can be arranged in Southeastern Wisconsin.  I can also make these as a cake-in-a-jar, which can be purchased and shipped on my etsy site:  www.tiamila.etsy.com

Wednesday, January 23, 2013

Brooch Bouquet - Putting it all together!

brooches, Rick Rack flowers, lace, and colored fabric
make one awesome bouquet!  Perfect for the wedding
day and enjoyment for years to come :)


Over the past week or so I've explained various parts of         
making a brooch bouquet - getting started, wiring brooches,
and making Rick Rack flowers.  Today we'll put all of those
steps together to form a beautiful bouquet!

I'll start with a list of supplies:

the base:
half of a Styrofoam ball
a Styrofoam cone
lacy fabric to cover the ball (if desired) - I got mine at Goodwill
colored fabric to cover the cone (something that matches your wedding colors) - mine was yellow
ribbon (something that matches your wedding colors) - mine was gray
Styrofoam glue
pins or staples


the flowers:
Rick Rack flowers (see previous post)
wired brooches (see previous post)
needle-nose pliers 

This whole process really will be more fun if you can hold yourself back from starting until you have gathered everything together.  That was not how I went about it - I was waaaay too excited to get started!  In the end though I wasted time and energy each time I started over - usually due to getting a few new brooches and wanting to add them to the mix, but not knowing where I could squeeze them in.  The last time I put everything together I had my piles laid out all around me (Rick Rack flowers, small brooches, big brooches, colored brooches, etc.) and I was able to visualize the whole thing better.  I was so pleased with the result!  I hope you enjoy the process and the product as much as I did!

step one:  prep the styrofoam.  Glue the Styrofoam ball half to the Styrofoam cone - it will look sort-of like an ice cream cone.  Let it dry.  Once dry cover the ball with lacy fabric, if desired.  I used pins to hold mine in place.
step two:  add flowers!  I will explain the process that worked for me, but of course you can add flowers in any order that you would like.  I started by grouping mine according to size, and then by color or metalic.  Next I went group by group and placed them into the ball, spacing them evenly around it.  That way I made sure I had large/small/colored/metalic all evenly dispersed.  On occasion I had trouble pushing the wire in far enough, and solved that problem by using needle nose pliers to push the wire into the ball. 
step three:  add texture and depth with Rick Rack flowers.  I used Rick Rack flowers to fill in holes and build up areas that seemed a little flat. 
step four:  add some frill.  I used a lacy fabric (similar to what I used on the fabric wrist corsages) to finish off the ball.  Simply cut to desired length and pin to the underside of the ball, so that it hangs over.
step five:  finish off the "stems."  The last step I did was to cover the Styrofoam cone in fabric.  I used pins to hold mine in place (I didn't use "permanent" adhesives like glue so that it could all be taken apart and re-used if desired).  I made a square of fabric and let the four corners "frame" the bouquet, sort of like leaves.  Then all you have to do is wrap your ribbon around the cone!  DONE!

This project ended up being one of my favorites of the whole DIY wedding process.  I got so many compliments and I am still able to enjoy the brooches to this day.  I love using them on purses, scarves, outfits, etc.  I'm even thinking of using some as handles on a small dresser I have.  But that's another project :)

Please let me know if you have any questions, or if you would like to see more pictures of this process!  I was having trouble loading photos today but would be happy to include some.

Do It Yourself - And I'll Help!
diyandiblog@gmail.com


Tuesday, January 22, 2013

Tangent Tuesday - Homemade Granola Bars...YUM!

Baking has been a passion of mine for a very long time!  As long as I can remember, in fact.  I think my love for baking is stemmed from three things:
one.  There is nothing like the feeling of calm I get while following a recipe, listening to the whir of my mixer, and rhythmically stirring, kneading, etc.
two.  I have an insatiable sweet tooth.
three.  Baking for someone is the easiest way to express love, gratification, and apology.  Sometimes I bake when I'm angry too, but I guess that's more for me than the person I'm mad at...

Anyway.  In my everyday life I also try to be healthy (I am NOT afraid of sugar and fat, my friend, but rather chemicals and "fake" food that a body just shouldn't have to ingest).  If you know me you know that I am certainly not strict about eating organically and naturally, but I try to make small, manageable changes in my everyday life.


Which brings me to granola bars!  Such tasty, delicious morsels of goodness!  They can be sweet, salty, chewy, crunchy - the list goes on and on.  Making granola bars is so simple, fast, and inexpensive that they are an easy exchange for the store-bought variety.  Plus, you will know EXACTLY what is in them - which doesn't include artificial flavors and sweeteners!  If there is a downside to this plan, I sure don't see it!

I've been trying different varieties of granola bars for a few years.  Some you bake, some you don't, some end up chewy, others are crunchy.  And the best part of course is that you get to put in exactly what you want - nuts, dried fruit, seeds, peanut butter, honey, coconut, banana, chocolate, carrots, raisins...

I decided to try a new recipe tonight, so that when I get together with some friends for Ladies Weekend I'll have a tasty, mostly healthy treat to share!

Home Made Granola Bars
I followed the recipe that you can find on this blog: givelovecreatehappiness and it turned out so well!  I followed the first recipe that is posted called "Nonna's Homemade Granola Bars".  I varied my ingredients slightly:

natural peanut butter
honey
unsweetened coconut
grated carrots
dark chocolate chips
raisins
walnuts
old fashioned oats

If you decide to add or subtract ingredients just make sure that the overall amount of dry ingredients stays about the same - otherwise the texture will be off.   I am very pleased with the overall result (and I'll have to keep these hidden until I leave on Friday if I hope to have any left) but I would make a few changes next time:

I would use either chocolate or raisins (not both) as the combo is too sweet for me
I would use more nuts and/or seeds to make the overall texture crunchier, and leave out some of the oats
I would bake it slightly longer; I baked it for 20 minutes
my kitchen timer -Trusty Trudy

Have you ever made homemade granola bars before?  What flavor combinations do you suggest? I would love some more ideas to try!

Tomorrow I'll finish up the brooch bouquet project by explaining how all of the pieces fit together!

Do It Yourself - And I'll Help!
diyandiblog@gmail.com

Wednesday, January 16, 2013

Rick Rack Flowers - the Possibilities are Endless!

As promised, I'll spend today's post talking about Rick Rack flowers and walking you through the simple steps to flower perfection. When I first learned about this possibility I was a bit nervous. To me, Rick Rack screams obnoxious clown costume or holiday sweater, NOT wedding elegance.

Case in point -
Not Pretty.

 I was pleasantly surprised with the gorgeous outcome.

Pretty.  (See the difference?)

The steps to making one of these beauties are going to look a little bit complicated.  Once you make your first, though, you'll easily be able to whip up a dozen during an episode of The Bachelor or Modern Family, whatever you prefer.  I tried to take a picture of each step because it's so much easier to be able to visualize everything.  You will notice that I used colored thread - this is for demonstration purposes only.  I suggest matching your thread to the color of your Rick Rack, although if you do a good job you won't really be able to tell anyway.  PLEASE leave a comment if you feel that I'm missing a step or if you have any questions, I will be more than happy to expand more if needed.  Here goes!

step one:  cut each piece of Rick Rack so that you can count sixteen waves on the "top" and fifteen waves + the two ends on the "bottom."  I did try different size variations, and this seemed to be the smallest amount of Rick Rack needed to make a flower that is still full looking (using less material = less $ = happy me!).
sixteen waves on top and fifteen on the bottom
step two: sew through each wave on the "top" of the Rick Rack, folding them like a fan as you go.  You will go through all 16 waves.  Make sure your thread has a knot at the end!

fold the Rick Rack like a fan as you go

When finished, your Rick Rack should look like this:

front view

side view

step three:  slide the Rick Rack down to the knot in your thread.  Tie both ends of thread together to form a loop - make sure it's tight!  Don't cut the thread yet.

if done correctly your Rick Rack should look like a goofy caterpillar

tie both ends of thread together in a loop


at this point your Rick Rack is starting to look like a flower, but the top and bottom are indistinguishable (is that a word?)
step four:  to add shape to your flower, lay it on the table with the "bottom" facing up (remember, that's the side with the two cut ends).  Without cutting the thread, start sewing through the inside corners of the waves.  When you make it all the way around the circle you can tie the ends together again.  Now cut the thread.

sew through the inside corners of the waves
pull tight to bring the sides together

step five:  turn the flower over so the correct side is facing up.  It should look more like a flower now, with two threads going through the center.  Spread the petals evenly and put the tip of your finger in each to help fluff them up.

two threads run through each flower, giving it shape
step six: now it's time to add the stamen to the flower.  I found that these really were an important step that added the perfect finishing touch.  You can find flower stamen in any craft store.  I usually find them in the cake decorating section.

adding the flower's stamen will be the perfect final touch!
Fold the stamen in half and insert it through the center of the flower, starting at the top.  I had a bit of trouble getting the fragile stamen wire through some of the flowers, and I found that a plastic fork with all but one of the tines removed was the perfect tool!  Leave a loop at the bottom of the stamen so that you can later attach a wire, if desired. 

insert the stamen from the top down, leaving a loop at the bottom
step seven:  use tacky glue on the bottom of the flower to keep the cut ends of the Rick Rack from fraying, and the stamen in place.  Any tacky or fabric glue should work.

the tacky glue I used to finish off the flower
step eight:  let your imagination run wild!  I used these flowers in my brooch bouquet as fillers and was very happy with the result.  They would also make adorable headbands, hair clips, brooches, etc.  To add them to my bouquet I wrapped floral wire through the stamen loop.  To keep them from drooping over I used floral tape.

Rick Rack flower with wire covered in floral tape
Now you're finished!  

I used yellow Rick Rack flowers in the bouquets that I made for my bridesmaids, as well as the groomsmen boutonnieres and mother wrist corsages.  Don't they look a bit like popcorn all piled together like this?
I hope you enjoyed!  Again, let me know if you have any questions!  Please Follow, Pin, Share, Like, etc!  If you would like to order any handmade flowers from me just send me an email or comment below.

do it yourself - and I'll help!
diyandiblog.gmail.com

Tuesday, January 15, 2013

Tangent Tuesday - home again, home again, jiggity jig

Tangent Tuesday :)

On this beautiful (and freeeezing) Tuesday I'm going to go on a little tangent from my posts about my wonderful DIY wedding and talk about what's going on NOW!  Back in June my incredible husband and I purchased our very first house (yay!) and we're in the middle of a daunting, exciting, pricey, time-consuming, and mostly fantastic new project of renovating and decorating our new home!

sold!  one of my favorite days :)
As you can imagine there have been LOTS of projects and changes going on since then, and I can't wait to start sharing them!  My plan is to finish up the wedding posts first, but I couldn't help but share a little tease about the big changes going on around here!  Removing 45-year-old carpet, painting, re-doing hardwood floors, tearing down plaster, hanging drywall, sanding, hanging trim, and so many other small projects along the way!  I am so excited about how everything is coming along and I've learned that there is nothing more exciting than walking in the door and feeling completely comfortable and peaceful in your surroundings.  

Since this is my first time owning a home I have never before had the experience of picking out paint colors with no parents watching/guiding my decision - talk about a new sense of freedom!

can you guess what this will become?

yes, the previous owners did decide that this was the best look for the first floor bathroom
no matter what I'm working on, Jobin is right there helping :)
Have you renovated a home?  Please share!  There really is nothing like the feeling you get from transforming an old house into a new home and filling it with memories of your own :)

Tomorrow I'll post about making rick rack flowers in a step-by-step guide, and then it will be time to put everything together for the brooch bouquet! 

Monday, January 14, 2013

Making a Brooch Bouquet - Fastening the Brooches


a few brooches (and an earring) from my bouquet

Now that you have your brooches gathered, it's time to start the fun (you were able to do that in one weekend, right!?)!  To get started, I would suggest wiring all of the brooches first and then placing them individually - that way you can lay them all out and see what you like together.  If you are anything like me you just won't be able to wait that long...I wired a few and started sticking them on the Styrofoam since I was SO excited to get started :)  It was a fun but ineffective method, as I ended taking them all off anyway and starting over once they were all wired.  Oh well, you live and you learn.


To wire the brooches I used floral wire that I already had on hand, but you can find this at any craft store.  Mine was green, which wasn't a big deal since you don't see it anyway, but silver would be just fine if you're worried about it.  Be careful when picking out your wire, because they come in various gauges (thickness) and if you get it too thin it will just bend when you try to push it into the Styrofoam.  It looks like this:
Each brooch will take it's own wiring technique.  The two most important factors to me were:
one: the brooch doesn't fall off on my wedding day
two:  the brooch is left in it's original, undamaged state (no glue, holes, etc)
Here is an example:
wired brooch
    Originally I covered each wire in white floral tape because I thought it might show, but I quickly realized that it didn't matter so I ended up skipping this step on most:
white floral tape covering the wire
This is a time consuming step, but I was able to really enjoy it and feel very sentimental as I handled and got to know each separate piece.  It's easy to be in a happy, relaxed mood when you're working with such beautiful things!

As fillers for my bouquet, I used rick-rack flowers and fabric flowers that I will explain in my next post.  The rick rack flowers look like this:
rick rack flowers
The best part is coming soon - once the rick rack flowers are finished you get to put it all together!  Here is a preview picture:
adding brooches, earrings, and rick rack flowers
Start working on that wire!  As I said before, it's a time consuming step, but one you can't skip.  It will be well worth the work!

Have you made a brooch bouquet?  I'd be interested to learn about other techniques that people have tried and loved!  Please feel free to share.

diyandiblog.gmail.com
do it yourself - and i'll help